Successful websites and blogs have many loyal followers who not only follow and read their content constantly; Rather, they interact with this content constantly through the comments section on the site itself. Some sites also allow their followers to participate in enriching the site’s content and publish their own posts on it through what is known as guest blogging.
If you are one of the website owners who want to create a special section through which you allow visitors and followers of your site to participate in publishing their own content and enhance their loyalty to the site, then in this article we will provide you with a detailed explanation of how to create a guest blogging section, organize it, and control its content professionally.
Why is it important to have a guest blogging section on your website?
The guest blogging section is one of the important ways to expand your site into an integrated community in which site administrators and visitors participate simultaneously. This type of online community contributes to increasing the site’s fan base, as it provides users with a platform that allows them to share their ideas on the sites they love.
Allowing followers to participate in writing on the site contributes to enriching, diversifying and increasing the content, which is what all site owners are looking for. As it is known, the secret to the success of any website or blog is the continuous production of content without stopping, and your followers may be one of the ways to achieve this, and for free as well.
Sometimes, you may be surprised by the content that your followers provide to your site. A loyal follower has a variety of views and ideas about what suits your site’s content. In the end, he is the one who constantly follows you and reads everything you write. It can provide great ideas for articles that you never thought of before, and help you compete for keywords that you never thought of before.
Add and organize guest articles section
There are several plugins with which you can activate the guest articles section on your WordPress site. One of the most important of these additions is the addition of User Submitted Posts . Which is distinguished by its support for several languages, including Arabic. It is available in a free version and a paid version that includes advanced features and settings.
To use the plugin, you must first install it on your WordPress site by going to the control panel and choosing Add-ons, then Add New. On the next page, type in the search box the name of the extension User Submitted Posts to search for it, install it, and activate it.

If you want more information on how to install plugins, you can read our next article on how to install a WordPress plugin and activate it on your site correctly .
After activating the User Submitted Posts add-on, you will configure the add-on properties by going to ( Settings ) in the control panel and then to (User Submitted Posts), to open the add-on settings page, which is available in Arabic. Through the settings page, you will be able to adjust the format of the guest articles form that must be filled out with the data you want in order for you to receive user posts.
You will find all the plugin settings under the heading ( Plugin Settings ) and these settings are grouped into sections.
Although there are a lot of settings and options here, working with them is easy and simple and you can leave most of them at default. Below we will explain to you these sections and the most important settings they contain:
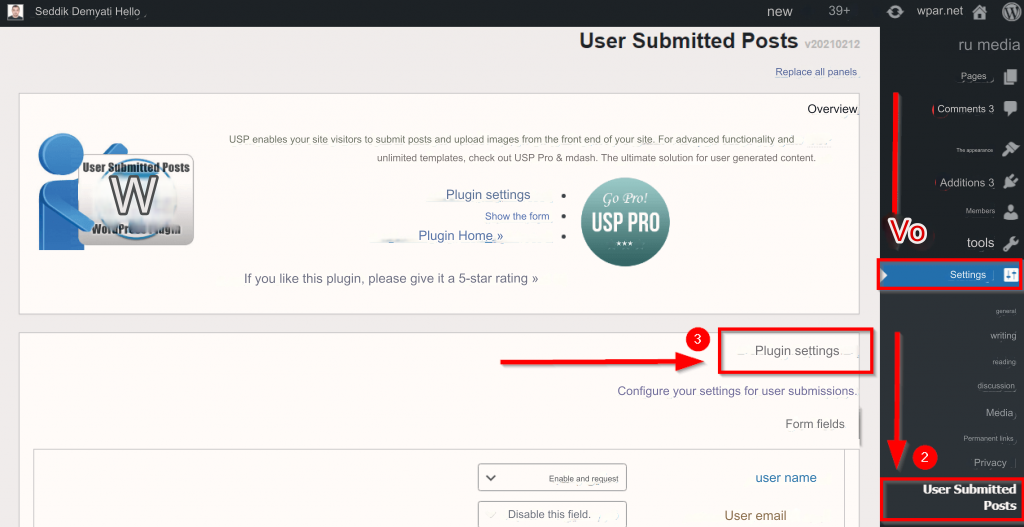
1. Form fields
Through this section, you can specify the fields that make up the participation form that you will receive from users. Through this form, you can specify the required data that the user must fill out when sending his articles to you.

Next to each of these fields there are three options:
- (Enable and request) : This option activates the field in the form that will be displayed to the user, and makes it necessary to fill it with data.
- (Enabled but not required) : This option activates the field in the form, but it is not necessary for the user to fill it with data.
- (Disable this field) : This option cancels the field and does not display it in the submission form.
The types of fields that the User Submitted Posts add-on offers you are:
- user name.
- User’s email.
- User URL.
- Job Title: Title of the article.
- Post tags: Article tags.
- Post category: Article category.
- Latest Content: Article content.
- Custom field.
- Challenge Question.
- Google reCAPTCHA.
- Post photos.
2. General Settings
This section contains some general settings related to how the form is loaded and how it works. Of course, most of the settings will not need to be changed, as the default options will do the trick, as we mentioned previously. But we will learn about some settings that you can change:

- (Other mode): Specify whether you want a submitted article to be reviewed before it’s published, published immediately, or published immediately only to users with a specified number of previous approved posts.
- (URL redirection): Specify the link to the page to which you want to transfer the user after he finishes filling out the form and sharing his article.
- (Success Message): The message you want to show to the user when his post is successfully submitted.
- (Error message): The error message that will appear to the user when an error occurs in the process of sending his contribution.
- (Unique titles): Requiring that article titles be unique to prevent repetition of ideas and content.
3. Privacy
Through this section, you can adjust privacy settings and agree to the terms and conditions, which are as follows:

- (Disable IP tracking) When this option is activated, automatic saving of users’ IP addresses will be prevented.
- (Display check box): When this option is activated, a check box will be added to the form that the user must activate to agree to the site’s privacy policy .
- (Error in check box ): In this field, you can write the error message that will appear to the user when he does not agree to the terms and conditions.
- (Text of the check box ): Here you can put a specific sentence that explains what will happen when you activate this option, such as: “I agree to the privacy policy and terms and conditions.”
3. Categories & Tags
This section contains options for displaying categories and tags as follows:
- (Categories): Choose the classification from among the classifications that already exist on the site, which will appear in the (Participation Category) field from (the form fields).
- (Multiple categories) : Activating this option will enable the user to choose more than one category for the article.
- (Use existing tags): Activating this option will allow the user to choose one of the article tags available on the site through the (Publish tags) field in (Form fields).
4. Users
This section will enable you to specify the post review mechanism by specifying the user who will perform the task. It could be the site owner or a member of the publishing or editorial team.
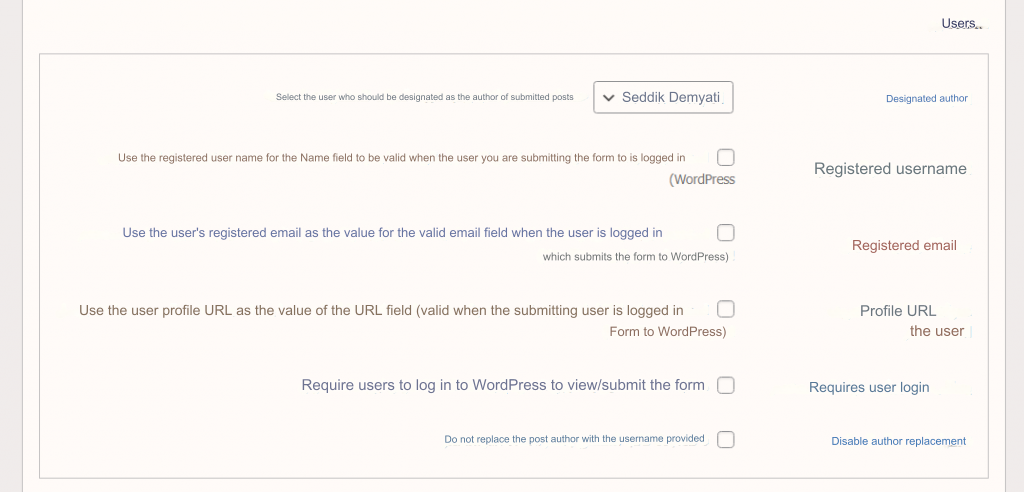
When you activate the option (requires user login), registration on your site will become mandatory for users to share articles. Which, in turn, will contribute to increasing the number of website subscribers and beneficiaries of its services.
It is mandatory to register on your WordPress site. It will allow the user to use the data he provided when registering in the process of sharing articles when activating the options (Registered User Name) , (Registered Email) , and (User Profile URL) .
Activating the option (disable author replacement) will ensure that the article is published under the name of the user who sent it, not the person who reviewed it.
5. Custom field
Here you can specify what additional custom field you want to add in ( Form Fields ).

6. Challenge Question
In this section of the add-on settings, you can put a question and its answer in order to protect your site from attacks by robots and flies.
The user must answer it before he can send his contribution, and when the user’s answer matches the answer you set, the user will be accepted as a human. You can also activate the ( case sensitivity ) option so that upper and lower case letters are not ignored when using the English language.

7. Google reCAPTCHA
You can use the famous reCAPTCHA service from Google and adjust its settings to protect your site from bot attacks as well.

Note : You can use either a challenge question, Google reCAPTCHA, or both together to double protect your site from bot attacks.
8. Email alerts
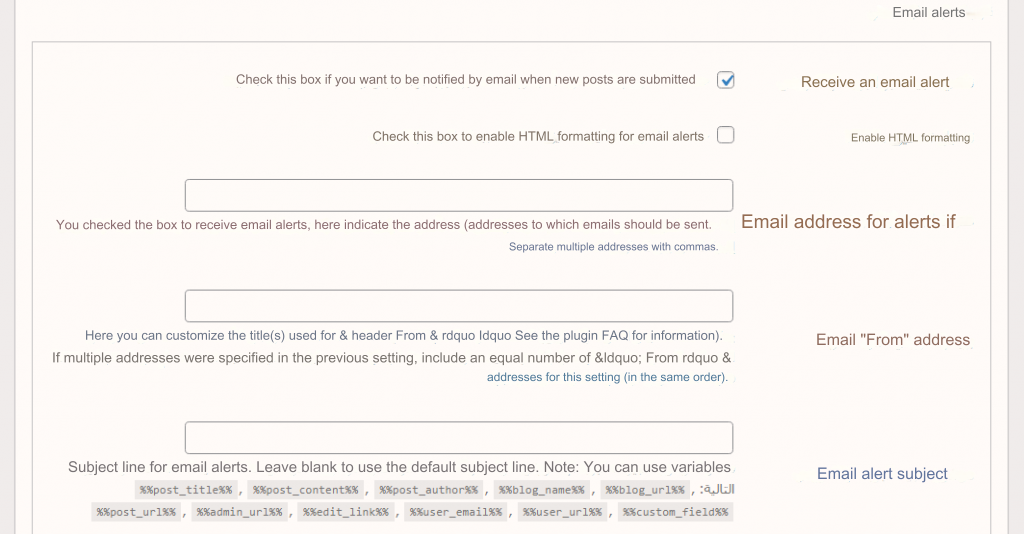
In this section, you can adjust the settings for the alerts that will arrive to your e-mail as follows:
(Receive an e-mail alert): Activating this option will allow an alert message to be sent to your e-mail when you receive an article from a user.
- Email Address for Notifications: Here you can type the email address you want to send guest post notifications to. You can also choose more than one email address by writing the addresses separated by commas.
- “Email “From” address: This field is used to identify the sender’s email.
- ( E-mail alert subject) : You can choose the subject of the message that will arrive in the e-mail. You can also write variables that refer to specific content, such as the user’s name, article title, user’s email, etc., which can be used as the subject of the alert email.
- ( E-mail alert message) : Through this option, you can customize the alert message that you will receive as you wish, while using the same variables to indicate specific content.
9. Image uploads
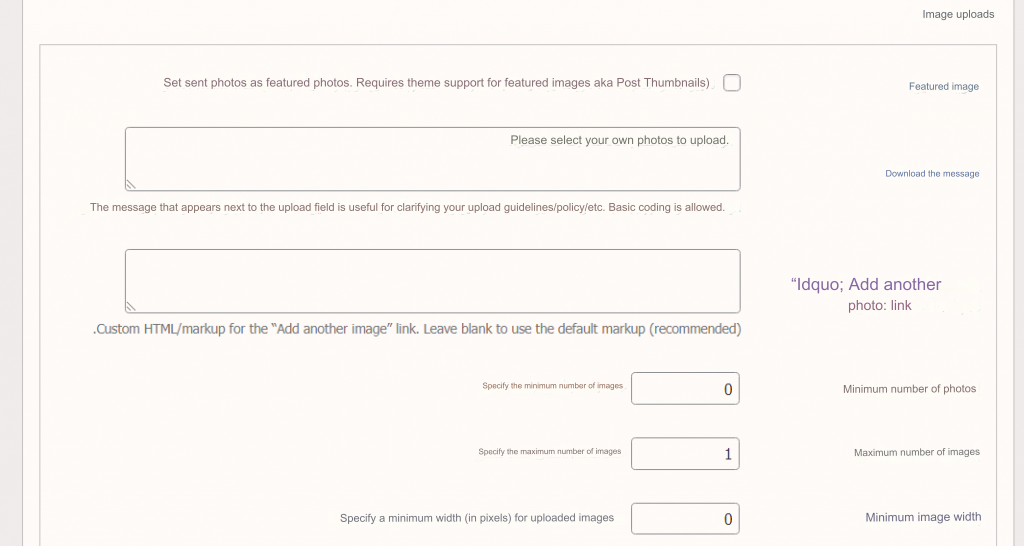
In this section, you can allow the user to upload any number of images that will appear when his article is published, and also allow him to designate an image as a featured image for WordPress by activating the (Featured Image) option.
You can also specify the minimum and maximum allowed images for each post and the allowed image dimensions.
Note: There are many settings that we have not touched upon, because they are advanced and you will probably not need to modify them, and their default mode will mostly be suitable for you.
Add a guest article submission form to your WordPress site
After you have finished customizing and adjusting the settings for the article submission form, you must of course add the form to a page of your site in order to begin receiving guest articles from users.
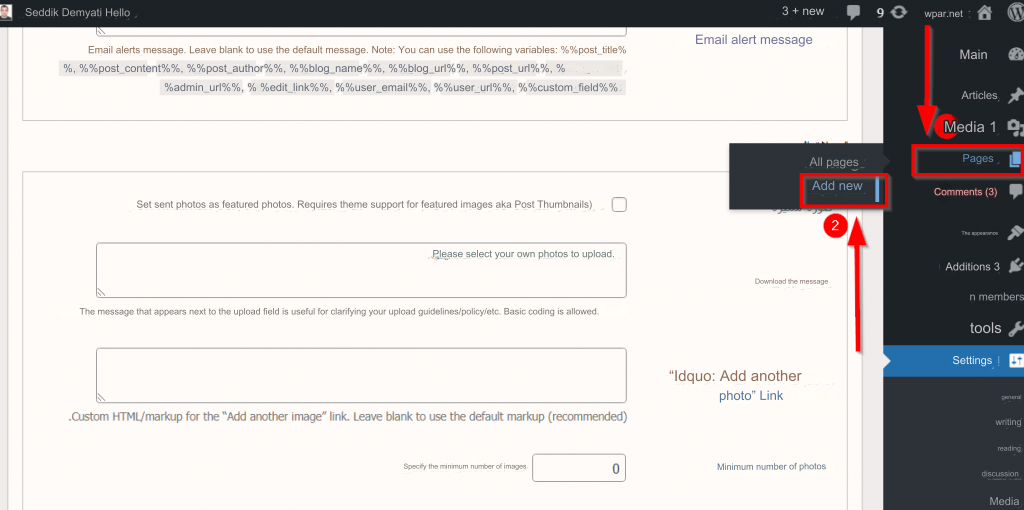
Therefore, you must first create a special page to display the form you created. This is done by going to your WordPress site’s control panel, clicking on ( Pages ), then choosing ( Add New ).
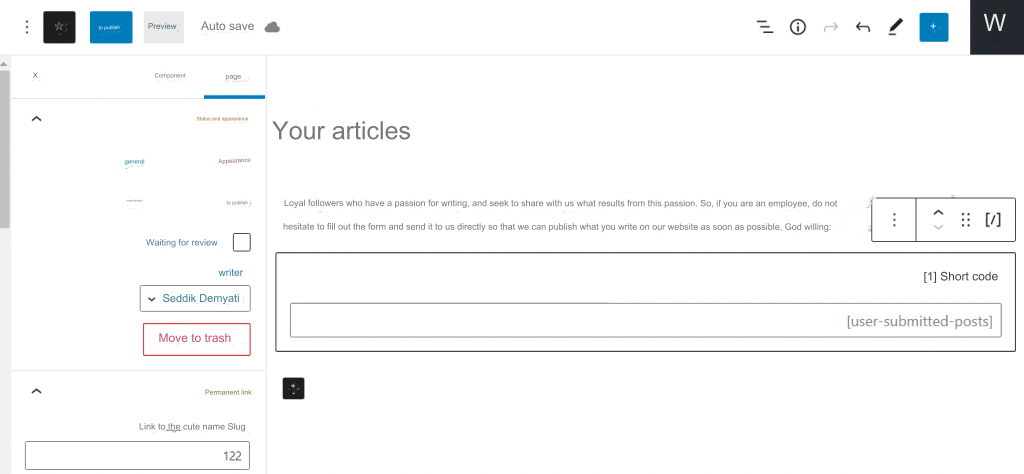
You will then be taken to the Gutenberg component editor where you can customize the page however you like. For example, write a letter welcoming visitors, thanking them for taking the time to write an article and sending it to you, and promising them that you will publish it as soon as possible.
After customizing and designing the page, you can simply add the form by typing the phrase (shortcode) in the component search box.

Then click on the short code component that appears in the search result, and a text box will appear in front of you, in which you enter the following code:
Finally, you can click the (Publish) button to publish the page directly on your site, or ( Save the draft ) to publish it later.
Thus, we explained to you the User Submitted Posts add-on, which allows you to create guest articles on your WordPress site, and we learned how to adjust its settings and customize it in the optimal way in order to allow your site followers to join you in the journey in competing for the best content on the Internet.


Leave a Reply