Auction sites are considered a type of electronic store in which you offer products for sale, but the sale is through an auction system, whereby the seller displays the product and sets the minimum price for it, below which the product cannot be sold. Then visitors or buyers begin bidding on the price of the product, and the owner The highest price is the one who wins the auction and is able to complete the payment process to purchase the product, and the auction ends at that time.
We previously explained the steps for creating an online store with WordPress , which is the basic step that must be taken before starting to activate the auction system within the store, as your site must first be designated as an online store in which you can activate the auction system for the products within it.
Benefits of creating an auction website with WordPress
As we mentioned in the introduction, the auction site is basically an online store for selling products, but in this case the sale process takes place through an auction system and not at a fixed price. Here are some of the benefits that auction site owners get:
- The ability to determine the lowest selling price while opening the auction for the product
- You get buyers competing for the product, which increases the chance of selling the product for the highest possible price
- Open auctions for your products within your own store without resorting to other sites that may take commissions from you or impose on you a usage policy that does not suit you.
Requirements for creating an auction website in WordPress
In this article, you will learn how to create an auction website using the WordPress system, using WordPress plugins and WordPress templates . Here are the most important requirements you need to start creating your own auction website:
- Preparing the domain and hosting : The first step is to purchase and prepare the domain and hosting, and it will certainly be useful to buy a domain name suitable for your business name.
- Preparing an SSL security certificate : This certificate helps your site appear to visitors in a secure way and helps apply certain levels of security to your site’s data
- Start installing WordPress on the hosting : WordPress will help us launch the auction site at the lowest possible cost and in record time.
- One of Al-Khalasa’s additions is activating the auction system within WordPress, which is what we will talk about in detail within the article.
Read also: WordPress explanation for beginners – a comprehensive and detailed guide
Activating the auction system within your WordPress site (practical steps)
As we mentioned at the beginning, the first step to creating an auction website is to have WordPress activated primarily as an online store, whether using the Woocommerce add-on to create stores , or one of the add-ons designated for building electronic stores, but we advise you to use WooCommerce.
After ensuring that the WooCommerce add-on has been successfully installed and activated , we now begin the first practical steps to activate auctions on products, whether current products if you already have an existing store or new products that you are adding again.
First, you will install one of the WordPress plugins that helps activate the auction system within WordPress. There are many of them, but we will choose the Ultimate Auctions plugin as it provides a free version and an easy-to-use user interface.
Then, after installing and activating the plugin, you will now find a new tab appearing in the WordPress control panel entitled Auctions , as follows:

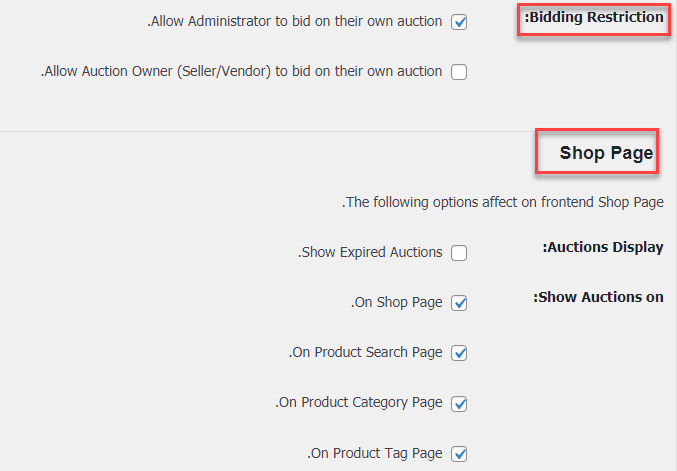
When you enter the special tab in addition, the settings page for the auction system opens for you within your site, from which you can configure all the settings for the auction system for products, the method of displaying the products in which the auction is available, and other settings, of which we refer to the following settings

One of the most important settings that you need to adjust within the auction add-on is the ability to specify Bidding Restrictions permissions for auctions on products , as shown in the previous image. This is an option through which you can activate the ability for the product owner, himself, or the store owner to participate in various auctions within the store.
Also, in the Shop page option located in the previous image, you can specify places to display products that have the auction system activated, where you can choose to have them displayed within the Shop page or in other places.
You can also activate the Auctions display option so that completed auctions will also be displayed within the store.
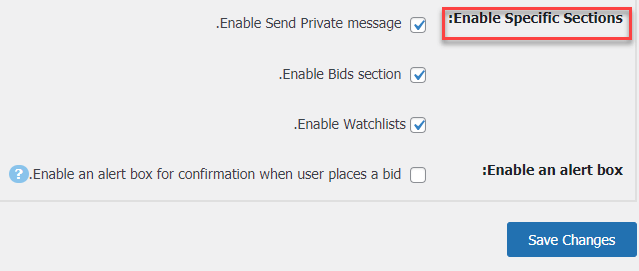
Also, one of the most important settings provided by the free version of the add-on is the ability to display some options to the buyer while submitting an auction for the products, as the following image shows:

In this option shown in the previous image, you can activate the first Private message , which allows the buyer to send a private message to the owner of the product or to you directly if you are the store owner.
While the second option is Enable bids sections , when activated, the rest of the buyers will be able to view all the auctions conducted by other buyers on the product.
There is also the Enable watchlist option , which can be activated so that the buyer can add the product to his favorite products list.
After you have activated the add-on for creating the auction system and customized all its settings as you wish, we now come to the most important step, which is publishing the products within the store and activating the sale on them through the auction system.
We will go to the WordPress control panel, then go to: Products << Add a new product
The product editing page will open for you, and we note here that this tab for adding the product appears because we already have the woocommerce plugin installed.
Then scroll your mouse to the bottom of the product addition page to find the settings box for product data as follows:
You will find the (Product Data) option at the top of the settings box. We chose the Auction product type , which activates the product as a product for sale in the auction system.
Once you select the Auction product type directly, you will see the six basic options located in the image above, which are as follows:

- Product condition : It is specific for determining whether the product is new or used. This option appears on the product page next to the product name.
- Opening price : Here you specify the opening price of the auction. For example, you can choose $100 so that the opening price of the auction for the product is one hundred dollars and buyers can start bidding with higher numbers.
- Lowest price : It is the lowest price for selling the product, below which a sale cannot be accepted.
- Bid increment : This is the amount of increase that the buyer can make every time he places an auction on the product. For example, you can specify $10 so that the minimum value of one auction is set at ten dollars, and it is not possible to increase the value less than that.
- Buy now price: It is the price that the buyer can pay directly and buy the product without waiting until the end of the auction.
- Ending date : The closing date of the auction for the product is determined, after which a new buyer cannot add more auctions for the product.
After completing all the product data and publishing it, the product will appear inside the store for sale using the auction system. The following image shows an example of two products, one of which is published and has a fixed price and can be added to the cart directly, while the other product is on the left using the auction system and the buyer can click on Bid Now to place an auction on the product:
When you enter the actual product page using the auction method, it will appear like the following image

As you can see in the previous image, the product appears with the opening price of the auction in front of it, which is $100 in this case, in addition to the Place Bid box , in which the buyer can add value to the auction, in addition to the Buy now button , which can be clicked to buy the product directly at the final price that we specified on the settings page. The product without bidding on it.
You can view all the auctions that have been placed on the product by buyers from within the add-on settings page, where each product appears in front of you and next to it you will find the auctions that have been added to it, where you can control them from within that page.
With this, we have reached the end of the explanation, and we can say that activating the auction system within your online store will be a very useful thing that can help you increase the selling price of the products that you offer and activate the auction system for them.
Try to set an opening price for the auction that covers the cost and profits of the product, because auctions may not be added at high prices as you expect, so setting a profitable opening price for the auction will be beneficial to you.


Leave a Reply