

Although the WordPress system enjoys a high degree of security and protection by default, the behavior of the site owner or some users may cause the site to be exposed to hacking and data theft. Examples of these behaviors include choosing a weak password to access the control panel, such as 112233.
For this reason, it is better to apply an additional degree of protection to WordPress so that this helps prevent people who were able to obtain login data from accessing the control panel in some way, and from here came the idea of two-factor authentication ( 2FA ) , which does not allow a person The login process is completed only after taking an additional verification step, even after entering the login data correctly.
In today’s article, we will learn about the concept of two-factor authentication, and its role in increasing the degree of protection of websites, and then we will explain in a practical way how to use the Google Authenticator application to activate two-factor authentication within WordPress sites to secure logins to these sites.
How does two-factor authentication work?
Two-factor authentication plays an essential role in combating login data theft attacks, the most famous of which is the Brute-force Login Attempts attack, in which hackers attempt to use some techniques to guess and predict passwords and user names to enter the site’s control panel.
Read more: Secure and protect WordPress websites from all vulnerabilities | Comprehensive guide
The idea of two-factor authentication depends on obliging the user to take an additional verification step after writing the login data safely. Therefore, even the person who logs in to the control panel using his login data will not be able to log in until after taking the two-factor authentication step.
The most famous example of two-factor authentication is social networking sites. When you log in to your account using your username and password, you will notice that the site sends a text message containing a code that you must also enter in order to be able to access your account. Therefore, the password and username will not be sufficient. To complete the login process.
There are multiple types and different ways to activate two-factor authentication within the site in order to further protect and secure the login process. Here are the most popular types of two-factor authentication used by site owners:
- Confirmation by the other party: This type of two-factor authentication prevents the process of logging into the site even if the login data is 100% correct, until another confirmation process is completed by another party, such as a confirmation code being sent in a text message, or within a phone application such as an application. Google Authenticator, which we will explain later.
- Special code: In this type, the user has his own code only in addition to the login data, so that during the login process he will be asked to enter the special code even after writing the login data correctly.
- Physical verification: Here the person uses some elements of his body to confirm the login process, such as using a fingerprint or face print after writing the login data in order to allow him to complete the login process to the site, and therefore no person will be able to use the login data without the physical fingerprint of the same person.
- Specific location : The location of the login process is also used as a type of two-factor authentication sometimes, as the login process is allowed to be completed from specific places only, and therefore if the login process is done from a different place, it will be blocked, and there are many WordPress plugins that do By applying this type of protection, such as adding Wordfence .
- Specific time : Exactly the same idea as place. This type allows logins to be performed at specific times only, and thus any attempts to log in at times other than those permitted are automatically blocked, even if the login data is correct.
How to connect the Google Authenticator application with WordPress
We will begin to explain the practical steps for applying and activating two-factor authentication within WordPress to protect the login page from illegal login attempts, using the Google Authenticator application.
First: Install the Google Authenticator plugin from the official WordPress plugin store and install it on your site.
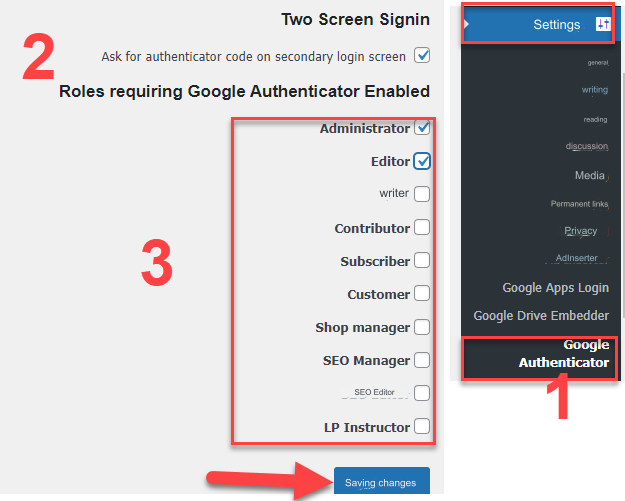
After installing and activating the add-on , go to the Settings tab within your WordPress site’s control panel, then go to the Google Authenticator tab .
Second: Click on the option to activate the two-step verification process after the login process is successful by clicking on the check box (Ask for authenticator code on secondary login screen)
Third: Choose the type of memberships within your site for which you would like to activate the two-step verification box on their registration processes, such as admin or editor.
After that, go to the Google Play Store to download the Google Authenticator application on your mobile phone:
After downloading the application on your phone, go back to the WordPress control panel, go to the Settings tab and choose the Google Apps login tab, which opens a screen containing the QR code that you will scan with your phone in the next step:

Return to the application on the phone, and click on the option to scan the QR code , and it will open the camera for you. Point the camera to the QR code shown inside the WordPress control panel as in the previous step, to scan the code:

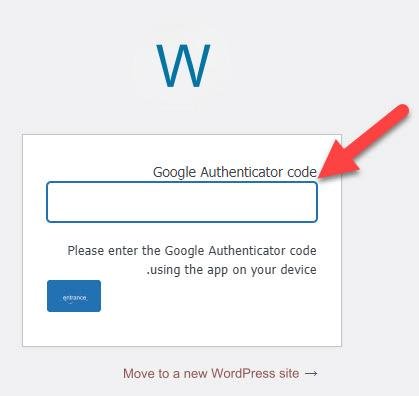
Once you scan the code on your phone, you will often see a 6-digit code. Type this code into the activation code box in the WordPress control panel, then click on the Verify Authentication Code e button as in the following image.

By completing this step, you will have successfully linked and completed the login process on your site with the two-factor authentication application from Google.
From this moment, when you log in to your site, even if the login data is 100% correct, you will have to take an additional confirmation step that will appear to you, where you will be asked for the login confirmation code, which you can obtain by opening the application on your phone to find the code appearing in front of you. Then you write it to confirm the successful login process.
Now the two-factor authentication application will work on all registration operations carried out by any of the site administrators, or all memberships for which you chose to activate authentication in the first steps of installing the add-on, as we explained.
However, you can still turn off two-factor authentication when a member logs in, by accessing the member’s profile from within the (Members) tab in WordPress, and deactivating two-factor authentication for this member only if you wish to do so:

Important note
Do not delete the two-factor authentication application from your phone until you deactivate its plugin on WordPress, if you later wish to stop two-factor authentication for any reason, so that you do not lose access to your account on the site.
Conclusion
In today’s article, we learned about the concept of two-factor authentication and how to achieve it on a WordPress website through the Google Authenticator application . As you noticed, activating two-factor authentication within WordPress is one of the easy things that you can do without much effort, so it is considered an option worthy of consideration for every website owner who wants to increase the degree of protection and security. On the login page for members and site administrators.
If you are the owner of a website or an online store, we advise you to activate two-factor authentication on your site now by following the steps that we explained in the article, especially after the spread of many vulnerabilities targeting access to the WordPress registration page to reduce the possibility of your site being stolen or hacked.